
The in-hear headset market is a relatively new one to aviation. For the longest time, if you wanted to comfortably wear a hat or sunglasses while flying a GA airplane, you were out of luck. The Clarity Aloft headset was one of the first in-ear aviation headsets to hit the market and solve this problem.
When I wanted to wear a helmet while flying my RV-6A, I started looking into in-ear headsets as the solution. At the time, there were only two in-ear headsets available: the Clarity Aloft and the Quiet Technologies Halo. I ultimately decided on the Clarity Aloft. After flying with the headset for more than 300 hours, I wanted to post up a longhand review of my thoughts on the Clarity Aloft headset.
Clarity Aloft Features
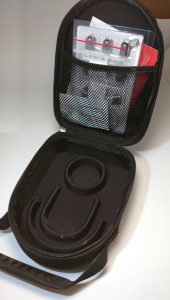
The protective case that comes with the headset is fantastic.
The Clarity Aloft headset comes in four models, each with their own unique features. Here are the models:
Clarity Aloft Classic:
Clarity Aloft Pro – Out of stock
Clarity Aloft Pro Plus – Out of stock
Clarity Aloft Link –
All Clarity Aloft headsets, however, come with the following features:
- Battery-less control pod with adjustable volume.
- Aux input (also works without a battery).
- Stereo/mono mode support.
- Dual electret microphone.
- Only supports standard twin-GA (PJ) plugs.
- Hard protective carrying case.
- Lapel clip.
- Removable eartips.
- TSO-certified options for part 121 and part 135 operations.
- 3-year warranty.
Clarity Aloft Review
Ear Tips
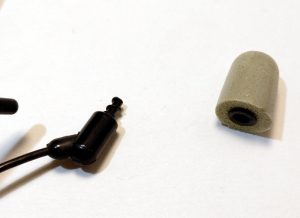
The Clarity Aloft eartips are easily replaced with a simple twist.
The headset will ship with 6 pairs of medium ear tips and a set of small and large tips. The ear tips are made of foam and build up earwax and dirt rather quickly. Past a certain point, this drastically affects their ability to attenuate cockpit noise. I would generally feel a need to replace my eartips about every 25 flights, but your results may vary depending on how comfortable you are with dirty tips and how much earwax you have. Fortunately, replacement is very easy. The tips are easily removed by screwing them on or off. Replacement Comply eartips are sold in packs of 6 pairs for roughly $18:
I was also able to use aftermarket eartips designed for other headsets with no problem. For example, you can use silicone eartips like these:
I tried these silicone eartips and found them acceptable. I believe the stock Clarity Aloft / Comply eartips provided the best sound attenuation though so I generally used them. One nice thing about the silicone eartips is that they are generally able to be cleaned, which means you won’t be replacing them as often. They also don’t suffer from the problem the foam eartips have during the winter. It takes an agonizingly long time to expand when cold, even with your ears warming them up. There have been several instances where I have put them in my ears, started the plane, taxied out, waited for the 100F oil temp, taken off and the eartips still had not fully expanded for a good seal. It is a minor annoyance – but something worth knowing for those living in the great white north.
While on the subject of noise attenuation, I have a few comments. The Clarity Aloft marketing materials claim an average of 40dB of noise attenuation, which is comparable to most ANR headsets on the market. I have frequently swapped between my Clarity Aloft headset and several ANR headsets while in flight for comparison and I don’t know if I believe these marketing figures. Don’t get me wrong: cockpit noise is substantially reduced by the foam eartips. I have no doubt that the noise level while wearing this headset is well below a level that would be considered “dangerous”. However, I also do not think that this headset compares well with the high end ANR over-ear headsets on the market when it comes to noise attenuation. Therefore, if maximum attenuation is your goal, you may want to stick with an ANR headset.
Microphone
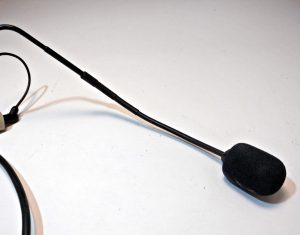
The mic boom of the Clarity Aloft was the perfect length for me and easily adjustable.
The microphone is a real high point of the Clarity Aloft headset. It is easy to adjust it to where you want it to be, and it tends to stay in that location. Many other headsets I have used have microphone booms that like to always seek back to a certain “configuration” meaning I am constantly adjusting them. The clarity headset does not do this.
More importantly, the sound quality on the microphone is fantastic. While it’s hard for me to call it the “best” without some sort of deterministic testing, I will certainly say that I have not used a headset that picks up sound as well and as clear as the Clarity Aloft headset does.
The foam pop filter will degrade over time like all pop filters. After 3 years of use, I had to replace mine twice due to tears. Replacements are inexpensive and can be purchased <here>.
Fit And Adjustment
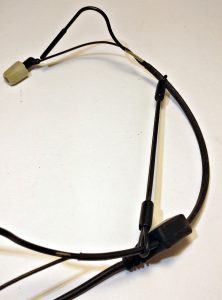
The Clarity Aloft headset is a little unique in that there is no adjustment capability. Instead, the headset is designed to hang off of your ears with the rear band extending out past the back of your head for most pilots. Rubber-coated metal bands are supposed to wrap around your ear and keep the headset oriented in a comfortable manner.
The benefit of this design is that the headset is one-size-fits-all. The problem is that it doesn’t work too well on its own. I found that in general the ear wraps were insufficient to keep the rear band from falling onto my neck uncomfortably. It seems the weight of the wire and volume control box is the primary cause of the headset “falling down” onto your neck. Fortunately this problem is easily fixed by supporting the weight of the wires with the included lapel clip. You just need to make sure you properly set that up and adjust it before every flight.
An adjustable elastic headstrap was an option, but I did not find it very useful.
Aloft Technologies also offers a flexible rubber “adjusting band” which is supposed to tighten the headset against the back of your head. I purchased this band and tried it out for a few hours of flight time but ultimately found it uncomfortable and ineffective when compared to simply hooking up the lapel clip properly.
I personally think the lack of adjust-ability of the rear band on the Clarity Aloft headset is its biggest weakness. Not only does it hamper the headset’s comfort, it also makes the headset look awkward with a significant portion hanging off of the back of your head. It seems like a simple sliding metal band would have been an easy fix for this – especially at the price that these are going for.
Control Box and Aux Music Input
When I was originally in the market for a pair of in-ear headsets, the primary reason I chose the Clarity Alofts over the competitors was the volume box and integrated auxiliary input. Being able to independently control the volume of my headset is a huge boon in older airplanes without great audio control. You have to remember that in-ear headsets have drastically different volume levels when compared to most over-the-ear headsets. If you are flying in an old airplane with a friend wearing an over-the-ear headset one of you is either going to be going deaf (probably you) or won’t be able to hear at all (probably them). This is easily solved with the independent volume control that comes with the Clarity Aloft.
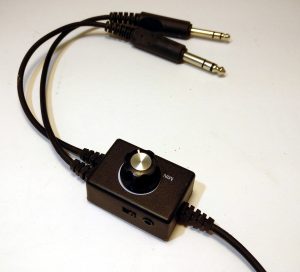
The auxiliary audio input was also a near-mandatory feature for me. During long flights, being able to listen to music is a “must-have” for me, and many airplanes I fly do not have the capability to feed music from my smartphone into the audio system. The Clarity Aloft headset gets bonus points for being able to deliver auxiliary audio without any batteries – a feature almost all ANR headsets cannot boast. I will say that the volume level for the aux input is pretty poor. I often find myself maxxing out the volume on my smartphone to simply get the audio level up to what I would consider a “medium” volume. A similar volume level on other headsets would blow my ears out (as it should).
Sunglasses
A huge benefit of in-ear headsets that was a surprise to me is how well they work with sunglasses. Most over-ear headsets have a problem with the ear seal being broken by the earpiece of sunglasses – partially defeating the sound attenuation and causing a lot of discomfort. This problem is doubly worse for ANR headsets, which rely on the seal for the active noise cancellation to work properly. I think Aloft Technologies is making a huge mistake by not marketing the fact that the Clarity Aloft headset might be the most comfortable and convenient headset on the market for pilots wishing to wear sunglasses while they are flying.
Clarity Aloft Models
The Clarity Aloft headset comes in four different models. These models primarily serve two markets: the general aviation public and professional pilots.
Clarity Aloft Classic:
Clarity Aloft Pro – Out of stock
Clarity Aloft Pro Plus – Out of stock
Clarity Aloft Link –
When it comes to GA models, there are two: The “Clarity Aloft Classic” is the model I purchased and used in this review. The “Clarity Aloft Link” model adds in Bluetooth capability for wireless music and phone calling. It is the only in-ear headset on the market at the time of this writing that offers this functionality. The downside of the Link model is that you have to use batteries to get it to work. Note the primary features of the headset will work perfectly fine with no batteries.
Professional pilots must wear headsets that are certified by the FAA, and Aloft Technologies offers two of these: the “pro” and the “pro plus”. The difference between the “pro” and “pro plus” is the mic boom configuration. The “pro plus” comes with the same mic boom as is seen in the GA headsets, while the “pro” model has a mic that is attached to the headset behind the ears. I don’t know why Aloft Technologies decided to have these differences but I assume it had something to do with certification.
Not having tried the mic boom configuration found on the “pro” model, I cannot make any recommendations here. I can only say that the boom in the classic model, which is the same as that in the “pro plus” is very comfortable. That there is a “pro plus” model probably indicates that this configuration is desirable. Therefore, if you are a part 135 operator wishing to use the Clarity Aloft headset, I would recommend the “pro plus” variant.
Conclusion
After using the Clarity Aloft headset over the course of 3 years, I have come away very impressed by the headset. Despite a few design oddities, it is a very comfortable headset that comes with all the benefits of in-ear headsets. If you are in the market for this style of headset and care as much about an auxiliary music input as I do, I think the Clarity Aloft is a solid choice you will not regret.
Pros
- One-size-fits-all in ear design makes it easy to wear a hat, helmet, and/or sunglasses while flying.
- Eartips are easy and affordable to replace and offer excellent passive sound attenuation.
- Microphone is possibly the best in the industry.
- Superbly light.
- No batteries required on most models.
- Inexpensive compared to most over-ear headsets.
Cons
- Cockpit noise attenuation is not as good as many ANR headsets.
- Lack of adjustable headband can make wearing the headset awkward.
- Auxiliary input volume is lower than other headsets.
- Stock foam eartips require frequent replacement.
Cleared to Hear Headset Rating: 8/10